


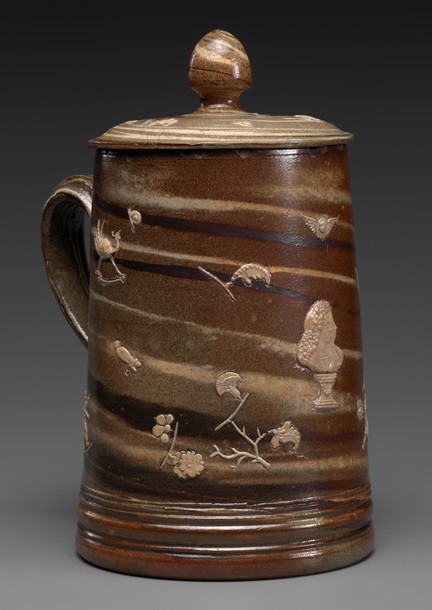
Factory of John Dwight, England (Fulham), 1670-1859. Covered Tankard, ca. 1685-1690. Stoneware with salt glaze, height: 10 1/2 inches (26.7 cm). The Nelson-Atkins Museum of Art, Kansas City, Missouri. Gift of Frank P. Burnap, 55-77 A, B. Photograph by Jamison Miller.
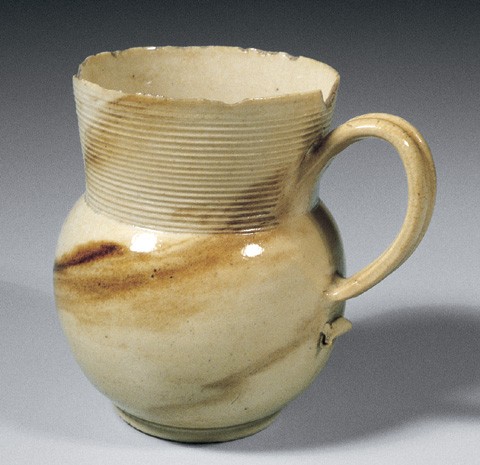
Mug, Francis Place, Yorkshire, ca. 1680. Salt-glazed stoneware. H. 3 1/2". (Courtesy, Mint Museum of Art, Charlotte, North Carolina. Gift of the Delhom Service League; photo, David Ramsey.)
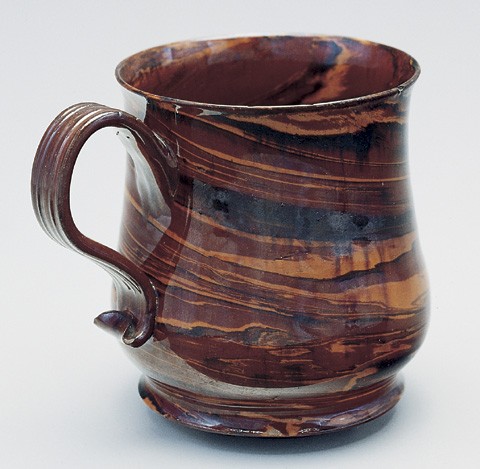
Mug, attributed to Samuel Bell, Staffordshire (Newcastle-under-Lyme), ca. 1740. Lead-glazed agateware. H. 4 1/2". (Courtesy, Troy D. Chappell Collection; photos by Gavin Ashworth unless otherwise noted.)
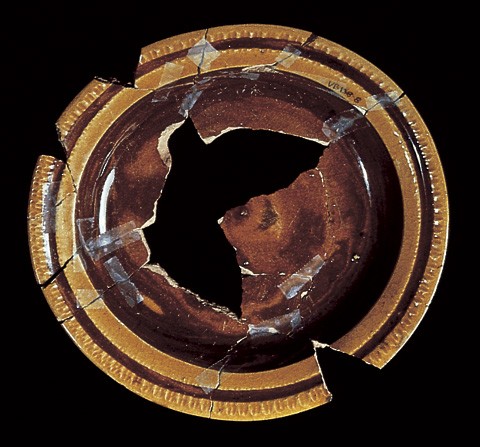
Dish, Staffordshire, ca. 1780. Lead-glazed agateware. D. 6 1/2". (Photo, Robert Hunter.) Dishes of this type appear to have been imported into America in large quantities as they are commonly found in archaeological excavations of the last quarter of the eighteenth century. It is uncertain if the agate effect was intentional or the result of using a mixture of different clays intended to create a better body. Precedent for the latter is found in the so-called Buckley wares made in North Wales from ca. 1720 to 1780, although this ware was covered in a thick black glaze and the agate body is generally not visible.
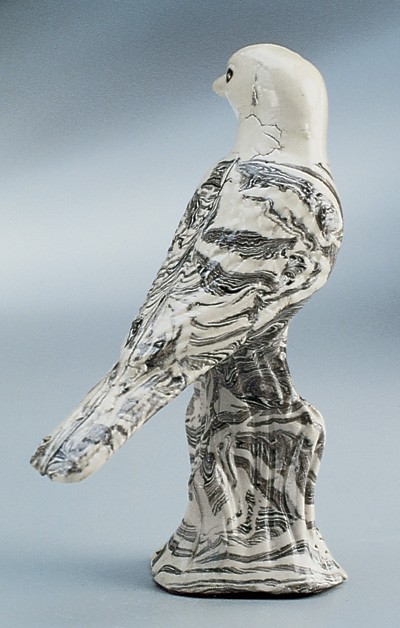
Bird, Staffordshire, ca. 1755. Salt-glazed agateware. H. 5 1/4". (Chipstone Foundation.) Only two colors of clay were used for this laid agate body. On other figures, particularly a group of press-molded cats, cobalt is often added.

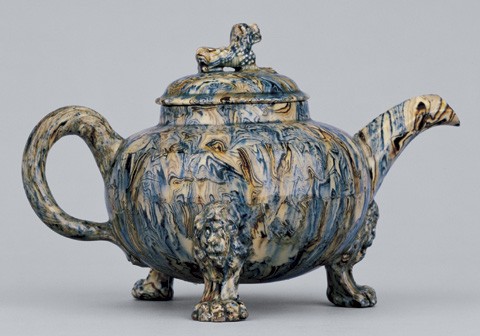
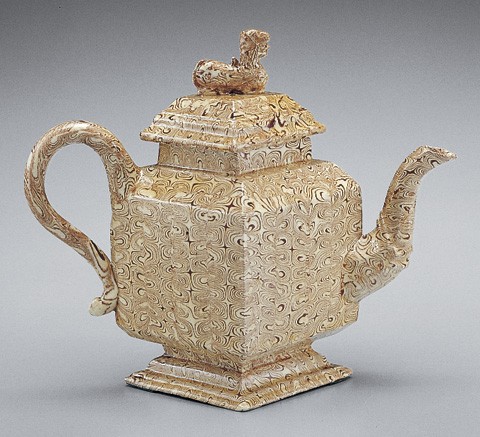
Teapot, Staffordshire, ca. 1755. Salt-glazed agateware. H. 5 5/8". (Chipstone Foundation.) Most of the salt-glazed laid agateware consisted of two colors although three-color examples exist. The orientation of this relatively simple agate pattern, sometimes called “elephant’s tooth” by collectors, is arranged in vertical strips.

Teapot, Staffordshire, England, ca. 1755. Lead-glazed agateware. H. 5 3/4". (Chipstone Foundation.) Two colors of earthenware clay were used for this shell shaped teapot. This is similar to the pattern illustrated in fig. 6, but with a horizontal orientation.
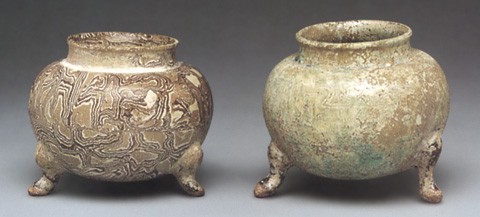
Footed censers, China, T’ang Dynasty. Agateware. H. 3" and 2 7/8". (Courtesy, Bonhams & Butterfields Auctioneers.)
Teapot, Staffordshire, ca. 1750. Lead-glazed agateware. H. 5". (Courtesy, Colonial Williamsburg Foundation.) Note the identical shape to the Chinese censers illustrated in fig. 8.
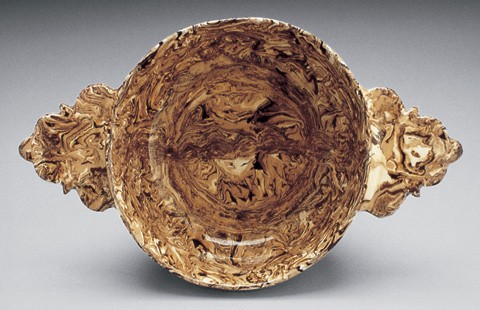
Porringer, Apt, France, ca. 1770. Lead-glazed agateware. L. 9 1/2". (Chipstone Foundation.)
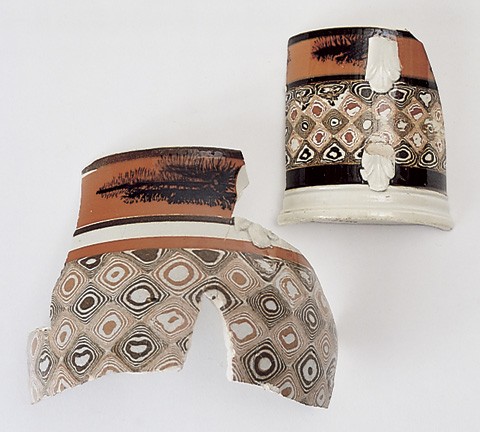
Mug and jug fragments, Staffordshire, ca. 1785. Pearlware. (Courtesy, Alexandria Archaeology.) Fragments from these similarly slip-decorated vessels are highlighted with a sheet of agate inlaid in the bodies.
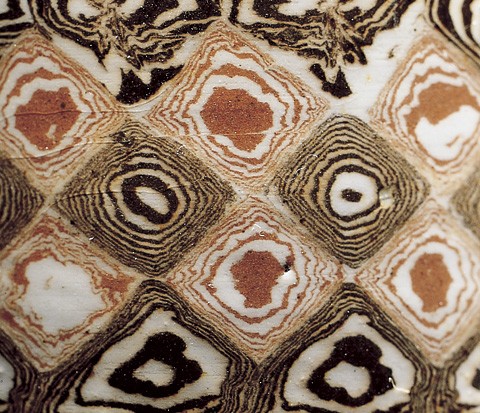
Detail of the agate inlay in the fragments illustrated in fig. 11. This pattern is created with alternating black-and-white and red-and-white squares of agate clay.
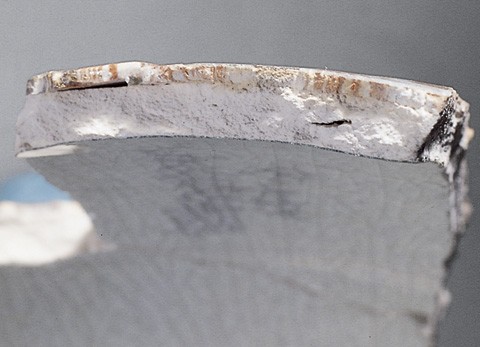
Detail of the fragment section illustrated in fig. 12 showing the thin solid sheet of agate veneered to the surface of the pearlware body. After the agate sheet was inlaid, the vessel was trimmed on a lathe to reveal this distinct pattern.

Tobacco pipes, Emanuel Drue, Maryland, 1650–1669. Earthenware. (Courtesy, Al Luckenbach.) These pipe fragments probably represent the earliest use of the agate technique in colonial America. The agate pattern was created using naturally occurring colored clays. Similar examples of Dutch tobacco pipes have been found in a circa 1620 context at Martin’s Hundred in Virginia.
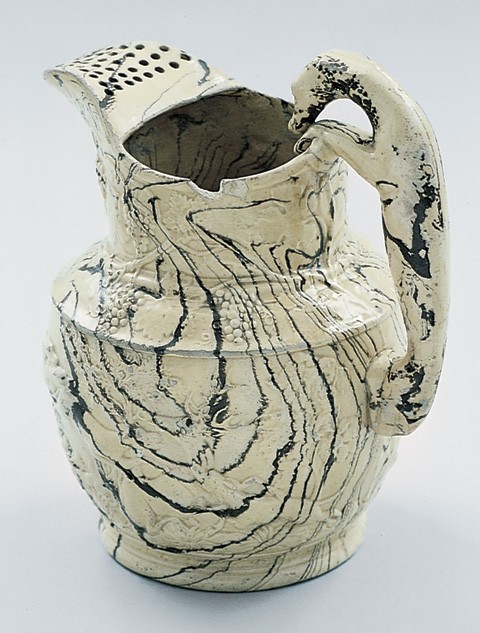
Pitcher, U.S. Pottery Company, Bennington, Vermont, ca. 1853. Lead-glazed agateware. H. 11 3/8". (Courtesy, The Bennington Museum.) This pitcher was designed by Daniel Greatbach. Ceramics historian John Spargo writes that scroddled ware was manufactured in the nineteenth century exactly as it was in eighteenth-century Staffordshire.
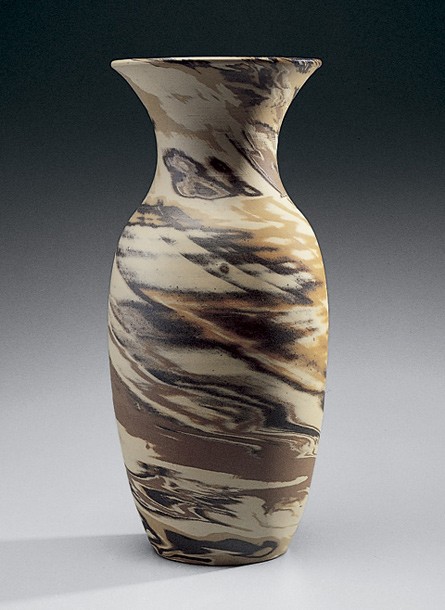
Vase, Evans Pottery, ca. 1950. H. 10 1/2". (Private collection.)
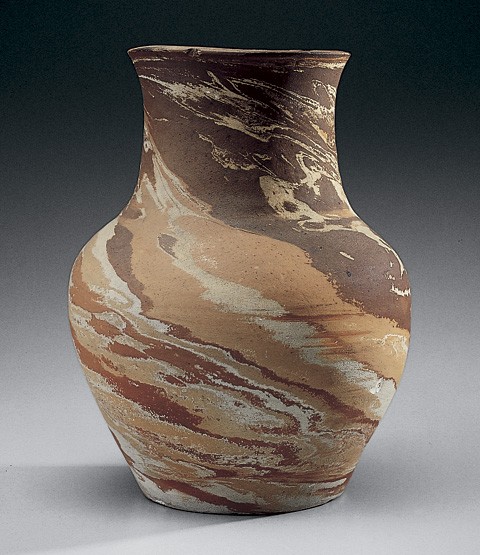
Vase, North State Pottery, North Carolina, ca. 1930. H. 9 1/2". (Private collection.) This thrown agate vase demonstrates extremely vigorous striations of clays. The interior is lead glazed.
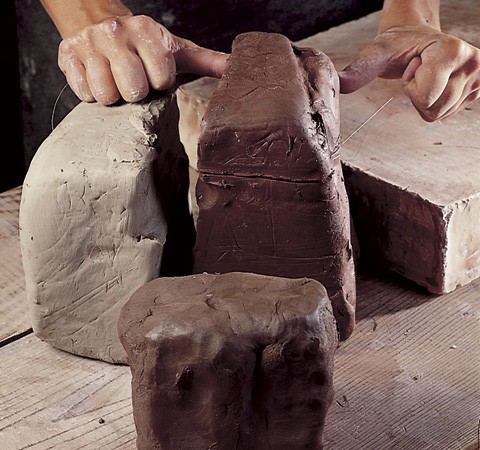
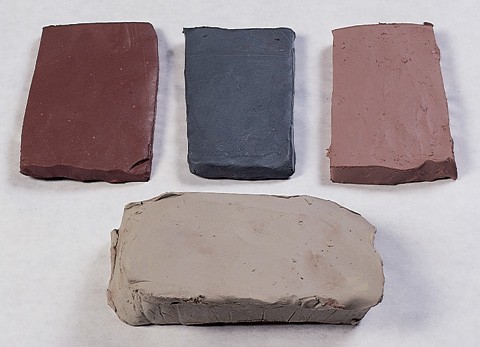
In preparing the clay for throwing an agateware mug, slabs of varied colored earthenware clays are cut and stacked. At this stage the proportion of the colored clays determine the intensity of the agate patterning. Three colored clays are selected for making a mug: a white clay, a red iron clay, and an iron manganese body.
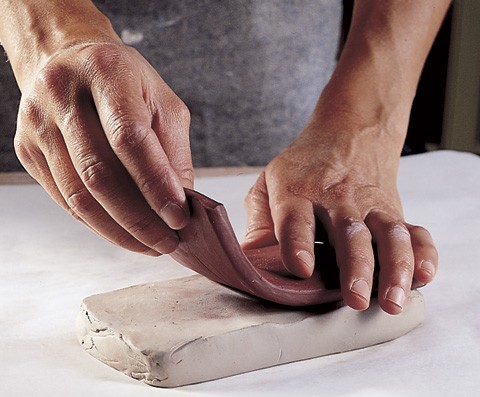
The slabs are then stacked in alternating colors. After the initial stacking, the clay is sliced in half and restacked to start with an even distribution of layers.

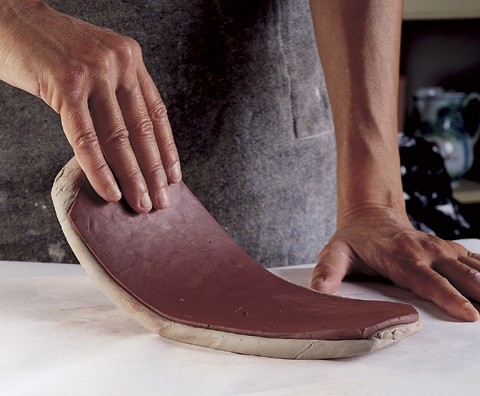
The clay is carefully wedged or kneaded to prepare it for throwing. Care has to be taken at this stage to expel air from the clay without overworking the clays. The more the clays are wedged the less distinct the resulting agate pattern.
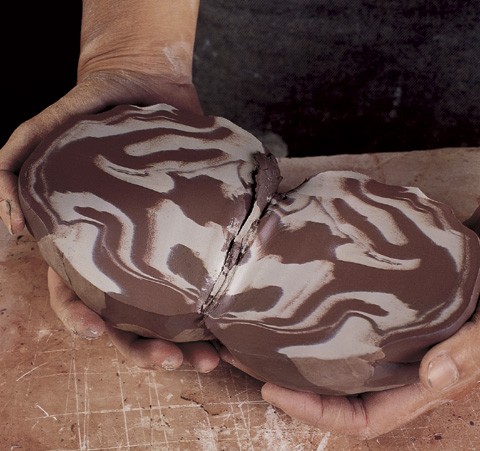
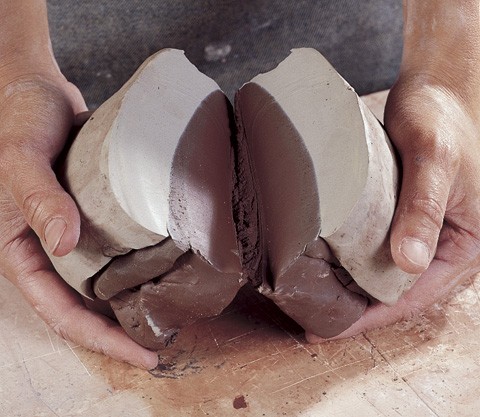
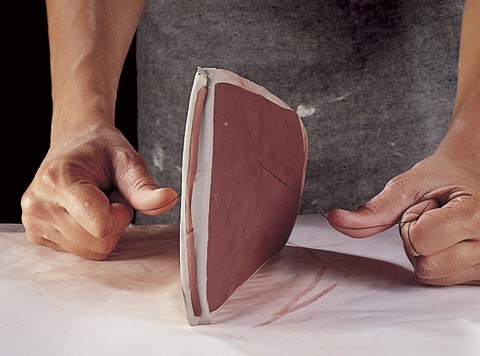
For demonstration purposes, the wedged ball is cut to show the pattern prior to throwing. Restacking these halves can improve the quality of the agate patterning in the finished product.
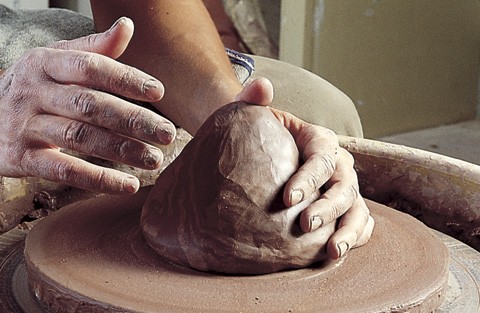
The prepared agate clay ball is centered on the wheel.
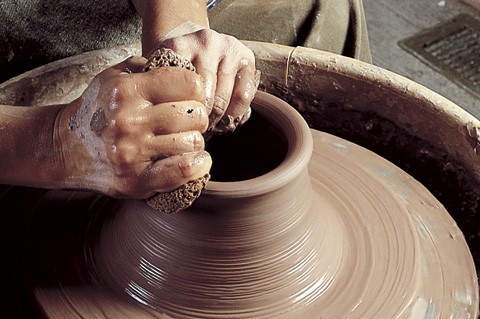
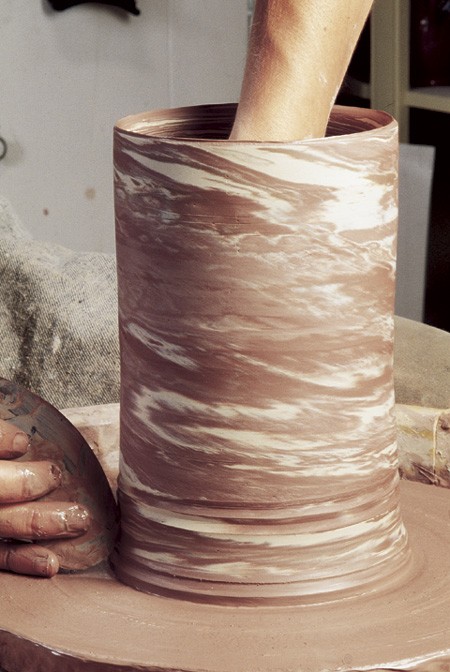
Once centered, the clay ball is opened and pulled quickly into a cylinder. During the throwing process it is important not to overwork the clay as this will lessen the distinctions between the colors.

The cylinder is shaped into the final mug form. Note how the muddy surface has concealed the agate patterning.
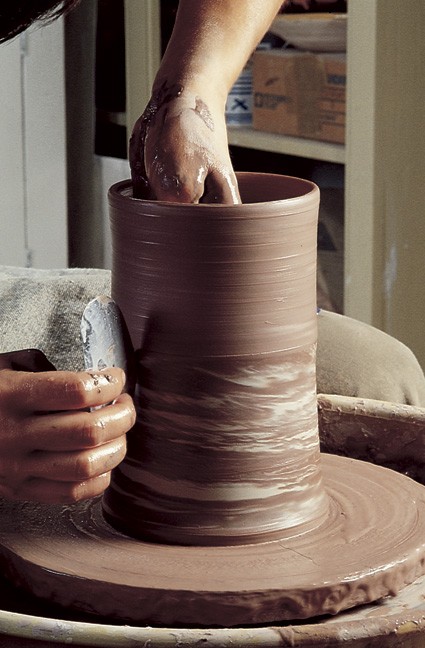
The final contours are shaped using a metal rib, and the muddy exterior of the thrown mug is scraped away, revealing the agate pattern.
Final finishing of the thrown mug.

Interior of the mug being scraped to reveal the agate pattern.
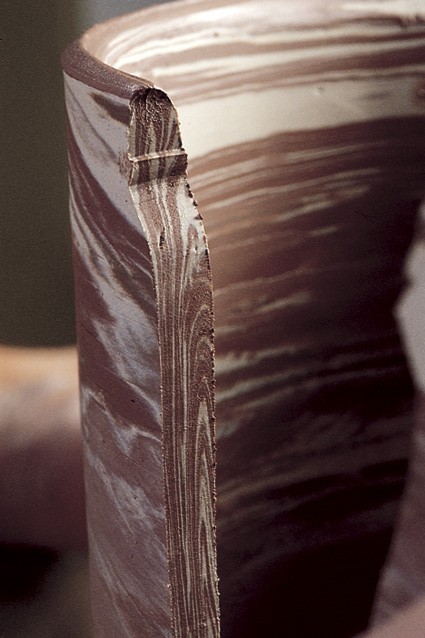
The thrown mug is sliced to reveal a cross-section of the body that shows the solid agate pattern and uniform thickness of the wall. Even wall thickness is important to the success of the next step.
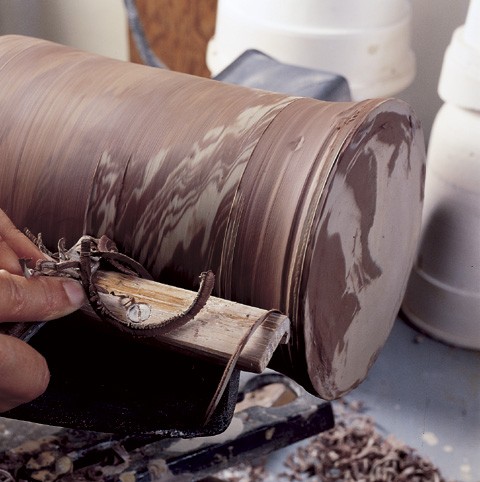
In the production of eighteenth-century Staffordshire hollow wares, the forms are affixed to a lathe for final trimming. After this stage, a handle is pulled or extruded from an agate clay ball and attached to the mug. Subsequently, the mug is dried, fired to biscuit, glazed, and refired.
Teapot, Staffordshire, 1745–1755. Lead-glazed agateware. H. 5 1/8". (Chipstone Foundation.) An example of a press-molded pecten shaped teapot. Note the seemingly naturalistic patterning of the laid agate which exhibits alternate squares of cobalt colored clay. This antique specimen serves as the prototype for the demonstration of the laid agate techniques.
Four colors of clay slabs. A base white earthenware is in the foreground. The other slabs have been colored with (left to right): iron oxide, manganese oxide, and cobalt carbonate.
A slab of iron enriched red clay is laid onto a base white clay of the same length and width. The slab of white clay is approximately three times as thick.
The combined slabs are repeatedly slammed on the table to stretch and thin the layers. This process of using the clay’s natural properties to achieve the thinning is a simple but elegant solution.
The combined clay slab is cut in half and the two pieces restacked. This process is repeated, continuously adding and thinning the layers.
The slab after cutting the second time showing two layers.
Cutting the slab in half after several repeated steps of stacking and thinning.
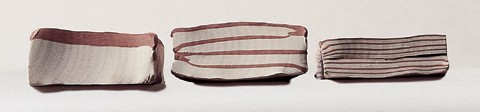
Cross-sections of the stacking and thinning process.
The three color clay slabs are prepared in the same way. The layered slabs are then trimmed to equal rectangular sizes.
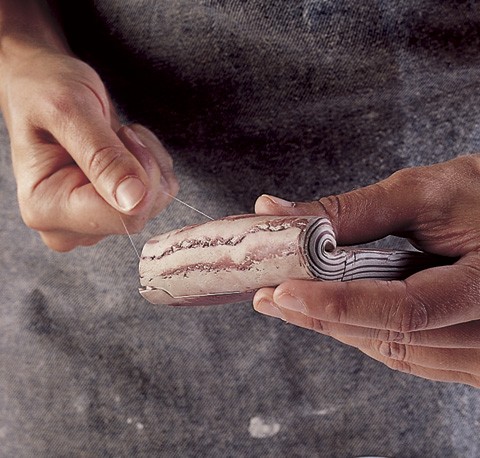
A coil is formed with each slab and cut from the slab. Several coils can be made from each slab.
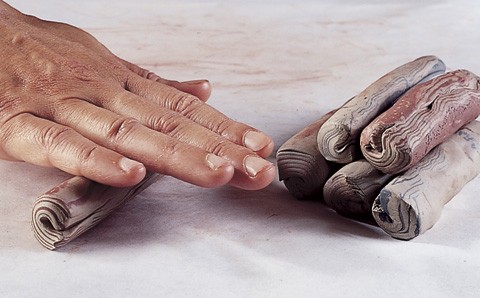
The coils are further rolled into cylindrical shapes.
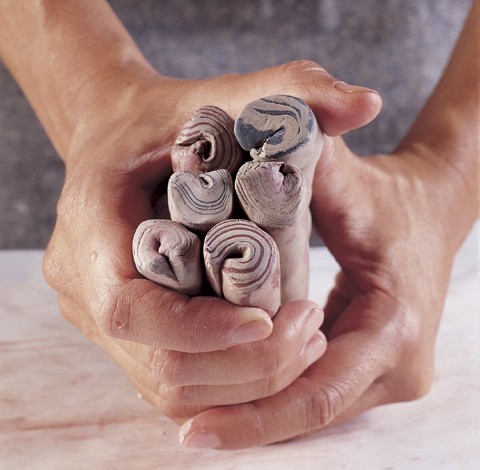
The rolled coils are arranged in alternating colors. At this stage, particular attention is paid to the arrangement of the individual colors. Note the similarities to the laid agate pattern illustrated in fig. 11.
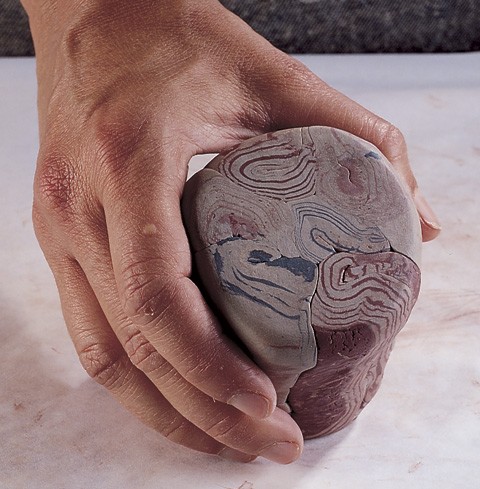
The coils are pressed into a solid cylindrical mass.
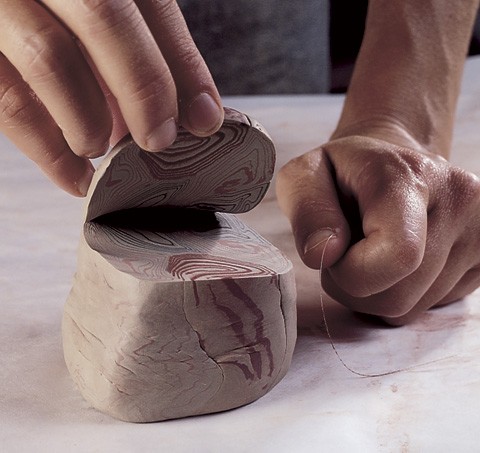
The mass is squared off and thin sections are cut from the stack revealing the beginnings of the agate pattern.
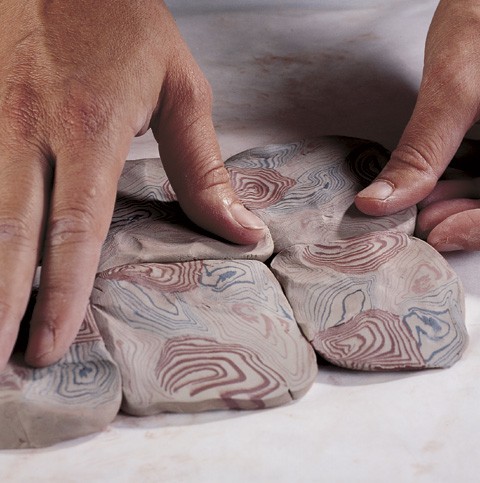
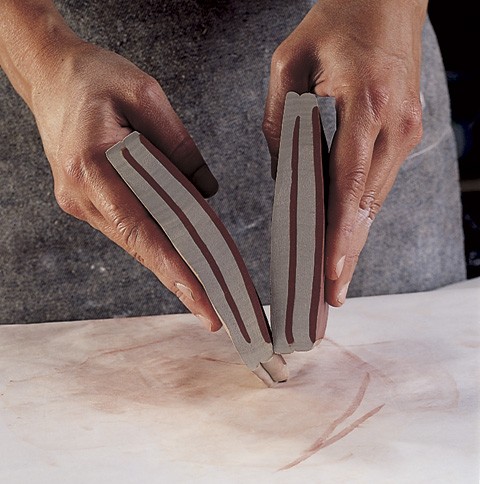
The sections are arranged and carefully pushed together on a flat surface alternating the patterns.

The sections are joined and flattened using a rolling pin. The paper provides a barrier to keep the pattern crisp and the clay from sticking to the rolling pin. The paper will be changed frequently during the next several steps to prevent smudging the surface.
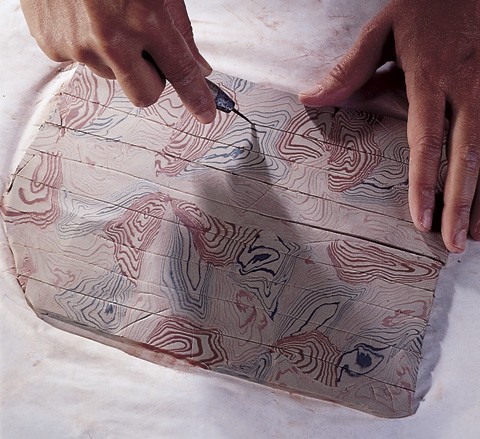
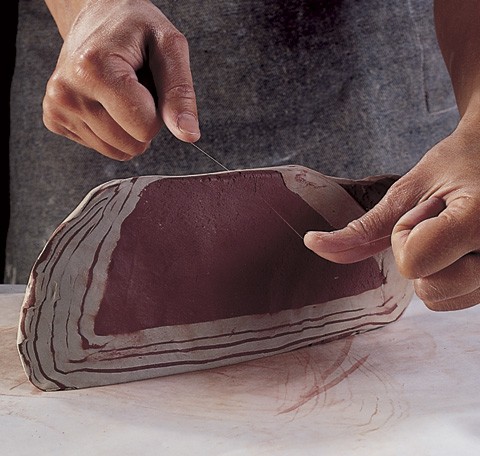
After a flat slab is prepared, regular strips of clay are cut in a horizontal plane.
The cut strips are rearranged to accentuate the agate pattern and joined again by rolling to a uniform flat slab.
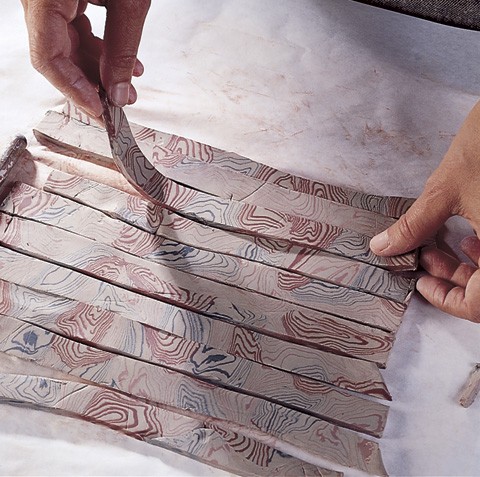
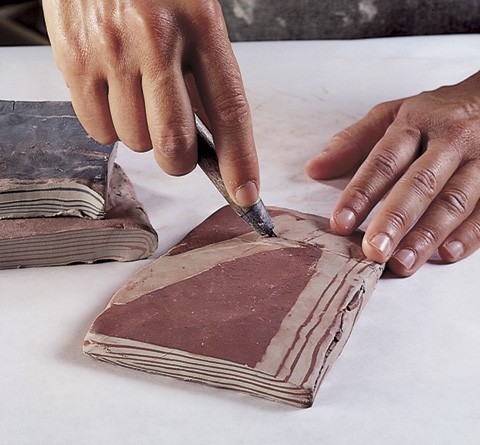
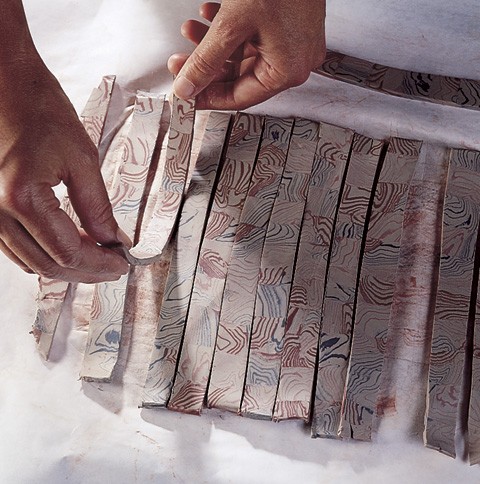
Strips of clay are once again cut from the newly made slab, this time in a vertical plane.

The strips are rearranged to intensify the agate pattern and rolled again.
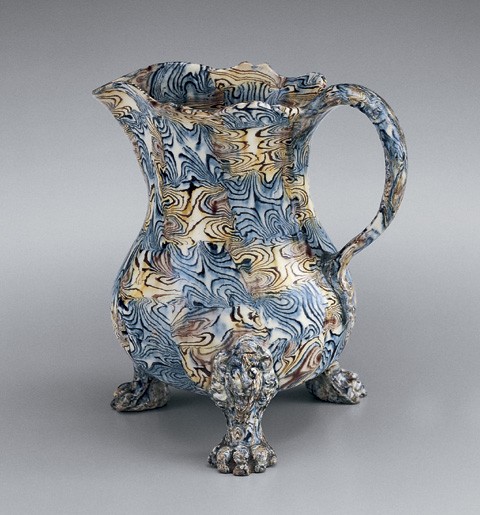
Cream jug, Staffordshire, ca. 1750. Lead-glazed agateware. H. 10". (Chipstone Foundation.) The body of this jug was formed in a two piece press mold. The cabriole feet were molded separately and applied, as was the handle.
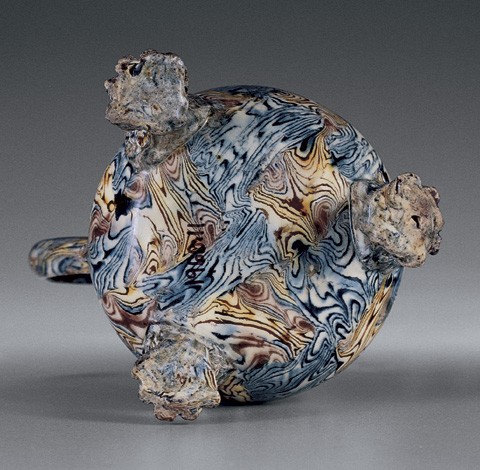
Bottom view of the cream jug illustrated in fig. 50. Note the checkerboard patterning of the agate strips which have been arranged in an alternate pattern. This view also shows the smeary patterning of the molded cabriole feet.

The final agate slab. At this stage, the checkerboard pattern created by both horizontal and vertical cutting is readily observed. For the demonstration, the patterning of the agate has been left moderately coarse so that is it easily observable in the photographs. The slab is now usable.

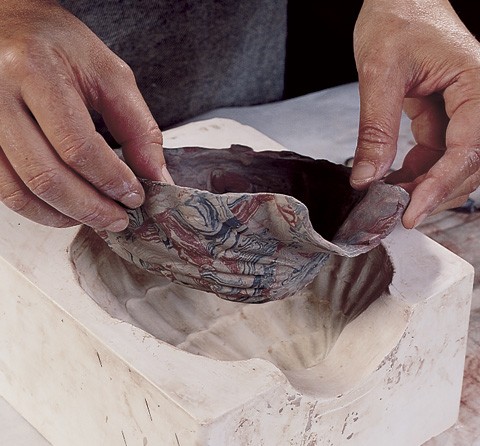
The thin agate slab being laid into the plaster press mold.
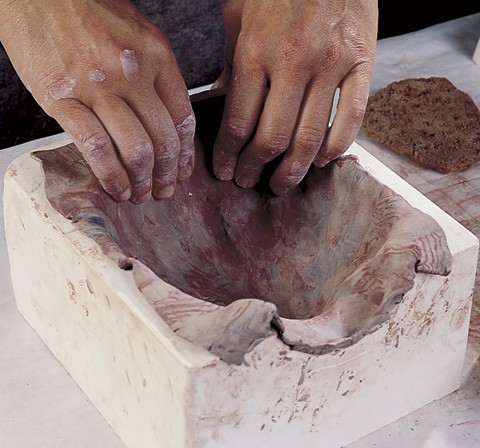
The slab is then pressed firmly into the concavities of the mold. Great care is taken to work the clay gradually into the recesses of the mold without tearing along the many seams in the agate sheet. Pressure from the fingers muddies the interior of the agate surface.
The slab is allowed time to firm up within the mold so the completed teapot half being removed is without distortion.
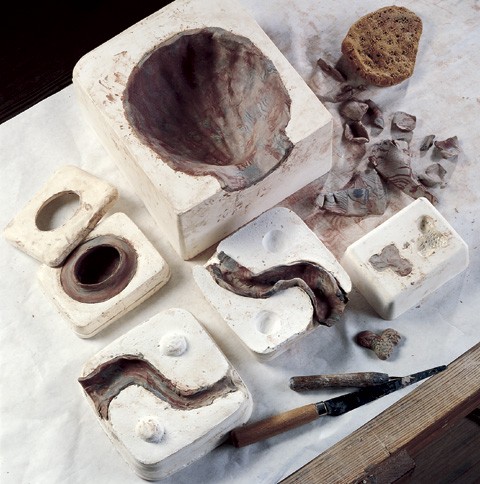
The two piece molds necessary for producing a pecten shell teapot including the body, spout, handle, and Fo Lion finial. These molds were taken from original master models sculpted by Michelle Erickson.
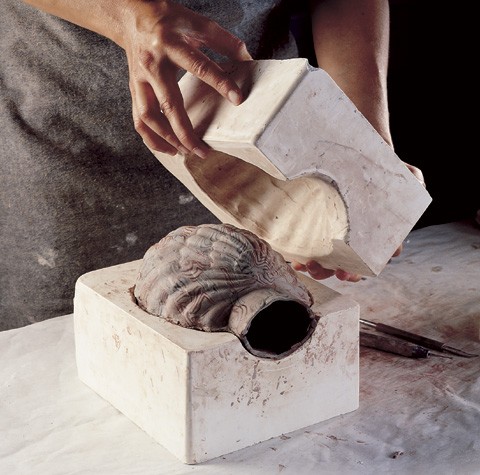
Once two halves are pressed in separate molds, they are ready to be joined. The edges are lightly scored and moistened. The two molds are aligned, and the seam is closed by working from the inside through the opening in the neck. After being joined, the teapot body is removed from the molds and the exterior seam is carefully smoothed and finished before attaching the spout and handle.
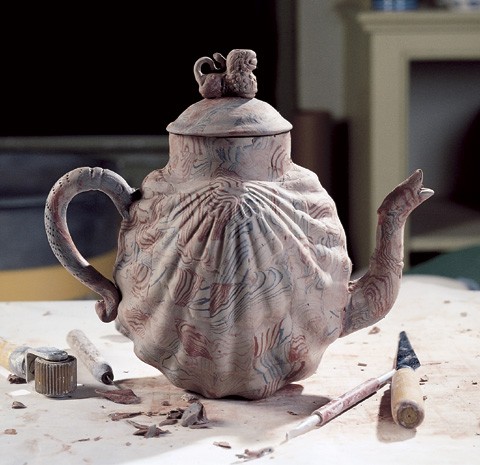
The assembled pecten shell teapot. The pot is now slowly air dried. Once dried, it is possible to enhance the agate surface with a light scrubbing using the equivalent of a fine steel wool. Any heavy smudging or distortion cannot be altered. The pot is fired to biscuit, glazed, and fired again.
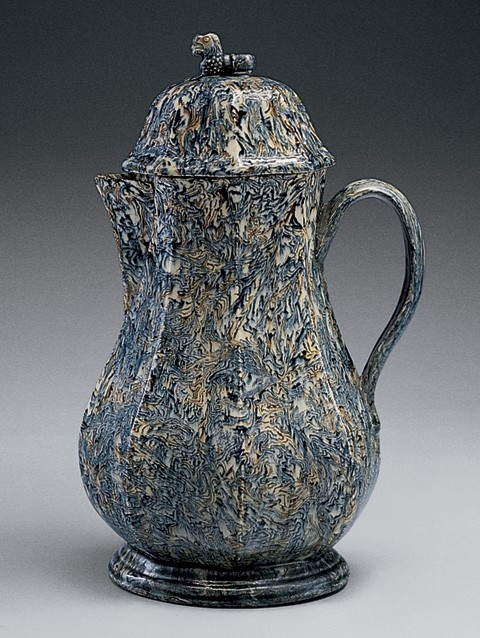
Coffee pot and lid, Staffordshire, ca. 1750. Lead-glazed agateware. H. 7 5/8". (Chipstone Foundation.) The body of this eight paneled coffee pot was made in a press mold. The handle, spout, and foot were molded separately and applied. The matching lid and the Fo Lion finial were molded separately as well. Note that this agate pattern was created using a variation on the technique.
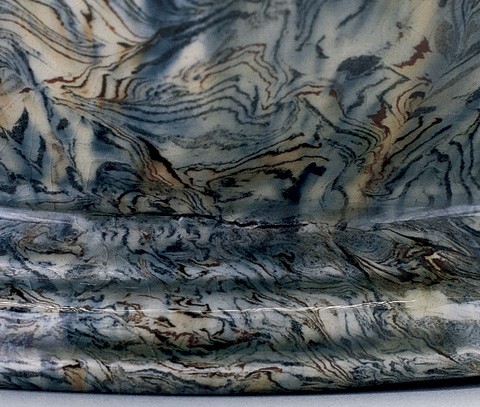
Detail of the applied foot on the coffee pot illustrated in fig. 59. The foot was separately molded and applied. The point of attachment can be distinguished by the discontinuities in the agate patterning and the slight separation crack that opened during later drying or firing.
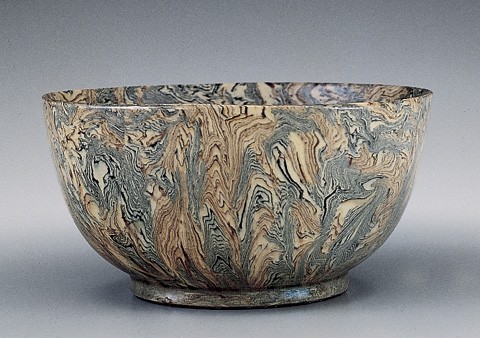
Waste bowl, Staffordshire, ca. 1750. Lead-glazed agateware. D. 5". (Chipstone Foundation.) A form that is typically thrown, this bowl had to be press molded using laid agate clays. Examination of antique agateware bowls and sauce boats indicate that two thin sheets of agateware clay were laminated during the molding process to create the interior and exterior patterns.

Detail of the foot attachment to the bowl illustrated in fig. 61. Note the distinct separation where the foot pulled away from bowl during the finishing process. Also note the distortion of the agate pattern on the interior of the foot.
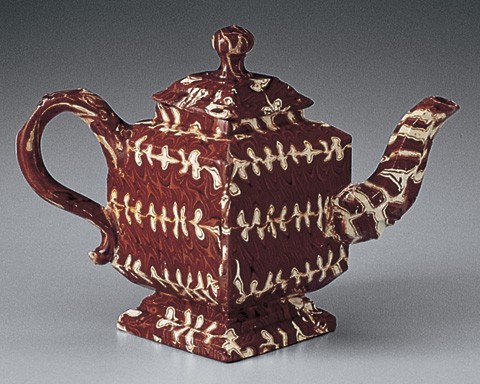
Teapot, Staffordshire, 1745– 1750. Lead-glazed agateware. H. 5 3/4". (Courtesy, Troy D. Chappell Collection.) The two-colored agate pattern used for this diamond shaped teapot has been commonly called “elephant’s tooth” by collectors.
Detail of the agate pattern on the teapot illustrated in fig. 63. Note the purposeful placement of both vertical and horizontal strips. Compare this relatively simple agate pattern with the stage of preparation illustrated in fig. 41.
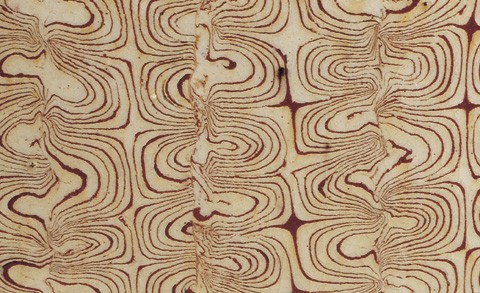
Teapot, Staffordshire, 1745– 1755. Lead-glazed agateware. H. 5 1/8". (Chipstone Foundation.) Although the form of this teapot is similar to that illustrated in fig. 63, an unusual three colored agate pattern is used. The effect is that of matched veneers similar to what one may see on furniture construction. The actual technique used to create this pattern needs further exploration.

Detail of the agate pattern from the teapot illustrated in fig. 65.